Let's Crochet A Busy Beehive Decoration or Pin/Pendant

Crochet a "Buzz" Around Your Garden - Or Just Wear It!
Do you love bees? They sure are out buzzing around out in my gardens, checking out all those new Spring flowers!
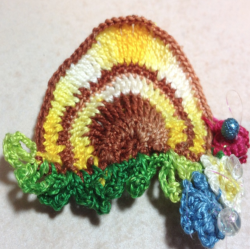
Here is a little beehive pattern for you, complete with busy bees! Work this up in thread as I've shown, or crochet it in any yarn of your choosing.
Jewel your bee with sequins, beads or rhinestones to add some pretty sparkle!
Make it into a pin or pendant. Make a whole bunch for a little bee mobile to hang in your garden or even as a household decoration! Pin a bee on your handbag. Your creativity is the limit!
Wouldn't this be a great little gift for a friend who loves bees, or for you!
What You Will Need
For just the crocheted beehive & bees:
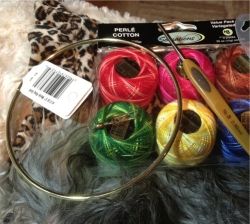
- Small amount Perle cotton size 8 thread in chosen colors (I used JoAnn Sensations Variegated)
- Crochet hook size 7 or your favorite
Optional Stuff:
- Brass hoop for hanging decoration
- Brass swivel (to make the decoration turn)
- Small amount monofilament (8-10# test fishing line)
- Barrette (find where jewelry making supplies are sold)
- One sleeping Schnauzer (to hold all the above for photo!) Thanks, Sue-Sue.
Supplies You'll Need On Amazon! - Click, Done!


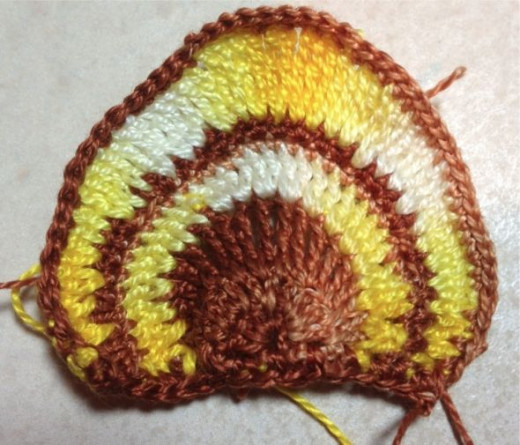
How To Make It
With Brown, CH 5. Join with sl st to first ch.
Row 1/
Ch 2, work 6 DC in ring. Ch 2, turn.
Row 2/
Work 2 DC in each DC across. Ch 2, turn.
Row 3/
Work 2 DC in next 2 DC. Work 2 TRC in next 2 TRC. Work 2 DTRC in next 3 DC. Work 2 TRC in next 2 TRC. Work 2 DC in next 2 DC. Fasten off.
Row 4/
With right side facing you, attach yellow to right hand side of work. Ch 2. *Work 2 DC in next stitch, one DC in next stitch. Repeat * and fasten off.
Row 5/
Attach brown. Work 1 SC in each stitch across. Ch 1, turn.
Row 6/
Work SC in next stitch, 2 SC in next stitch. Repeat across, fasten off.
Row 7/
Work 2 DC in first 5 SC. Work 2 TRC in next 4 SC. Work 2 DTRC in next 5 SC. Two TRC in next 4 SC, 2 DC in next 5 SC. Fasten off.
Row 8/
Attach Brown, SC in each st across. Fasten off.
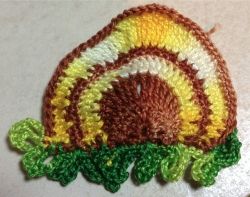
Leaves:
Attach Green to lower edge, flat side of beehive. *Ch 4, DC at base of ch 4 just made. Ch 3, SC in base of ch 3 just made. (single leaf made). Ch 3, SC in base of original ch 4. Ch 4, DC at base of ch 4 just made. Ch 3, SC in base of ch 3 just made. Ch 3, SC in next SC of brown edge. (2-Leaf group made). SC in next 2 SC. Make single leaf followed by 2 SC in brown edge across to corner. Make another 2 leaf group. Fasten off, weave ends.
Flowers:
(Make as many flowers as you wish individually and tack them into place).
Ch 5, join with sl st to form loop.
Round 1:
Work 6 SC in loop. Join with sl st to first SC.
Round 2:
Ch 3, SC in next SC. Repeat around, join, fasten off.
Adding Embellishments!
I embroidered a bee with satin stitch, then overlaid the stripes with Kreinik gold embroidery thread. I added a few crystal beads strung on wire and fastened to the crochet. I created a spiral with copper #20 wire and fastened the decoration to a barrette clip blank. Ta-da... sparkle!
Amazon Spotlight Personal Review - I Promise You Will Love These!

Hanging Your Twirly Decoration
Tie a piece of monofilament to one end of brass swivel and attach the other end of line to your decoration. Tie a second piece of monofilament to the other end of swivel and make a hanging loop on the opposite end.
Making A Brass Ring Decoration
Run a piece of monofilament about 4" long through top of your decoration. Tie to brass ring very tightly, leaving as much hang-down of line as you wish. Attach a second piece of monofilament half the length you wish your hanger to be to the brass ring with a secure knot. Attach other end of line to swivel. Cut a second piece of mono the same length and attach to other end of swivel. Make a hanging loop or attach other end to purchased hanger.
What Do You Think Of This Pattern? - Come On, You Can Tell Me!
So, how do you like this pattern?
A Word About Thread Selection...
I chose to use JoAnn's Sensations Perle Cotton for this project. I loved the subtle tonalities in their variegated threads! Use whatever thread you wish, just make sure to use the same or very similar thickness of thread for all colors to keep your pattern correct.


