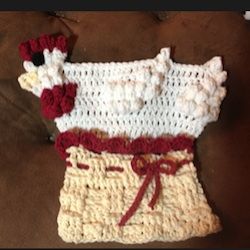
Mrs. Chicken Potholder - A Free Crochet Pattern!

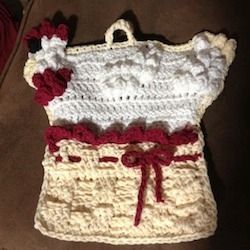
Mrs. Chicken Becomes A Potholder!
Here's a fun and sturdy potholder to add to your kitchen décor! If you collect chickens, this bird's for you! Recently I published a pattern here for the Mrs. Chicken Kitchen Decoration. In this evolution, she becomes a double sided potholder. I'll include hear her original crochet pattern, along with instructions to complete the back side and border.
For the back, I am just giving general guidance instructions, not exact stitch by stitch directions. I've included photos you can refer to if you want exact stitch counts. In other words, this is for confident crocheters who can "wing it" just a bit with general instructions.
She is designed in 100% cotton worsted weight yarn. The most difficult stitch is Double Crochet.
Mrs. Chicken will give a smile anytime you see her. She is machine washable and dryable too.
Have fun crocheting her for yourself, or as a gift for someone who enjoys chickens!
The Schnauzer Difficulty Rating! 2/Easy

What You Will Need
Small amounts of 100% cotton worsted weight yarn - I used Peaches n' Creme for this project
Crochet hook size G or your preferred
A Word About Yarn & Thread Selection...
You may use different yarns such as scrap yarns or threads with good results! Just make sure to keep them similar in weight and thickness so as not to throw off the pattern.

Let's Make The Magic!
A Crochet Pattern By SheilaSchnauzies
Pattern and all content SheilaSchnauzies 2013
Please do not distribute this pattern anywhere internet, email, real world or otherwise.
You may sell items made personally by you from this pattern. Thank you!
What You'll Need
Small amounts each of Red, Cream, Black and White cotton worsted yarn (i.e. Peaches n' Creme)
Clover Soft Touch Touch size G
Small amount choice of color embroidery floss OR large black bead, felt circle, etc. for eye
Embroidery Needle
Special Stitches
5-Double Crochet Popcorn (5-DCP)
Work 5 DC in specified stitch. Remove hook from loop. Insert hook from front to back through the first DC of popcorn, grab dropped loop and pull through firmly. Chain 1 tightly to close.
Reverse 5-Double Crochet Popcorn (R5DCP)
Exactly the same as the 5-DCP except that you insert your hook from back of work to front in the first DC, grab the dropped loop from the front side of work and chain 1 tightly to close. This puts the "puff" on the opposite side where you want it to be.
Directions
With Cream, Chain 28.
Row 1
DC in 4th chain and in each chain across. Ch 2, turn.
Row 2
Work a Front Post DC (FPD) around the 2nd DC in previous row and in the next 3 DC. Work Back Post DC (BPD) around back of post of next three DC. Continue alternating 3 FPD and 3 BPD across row, ending with a DC in the last stitch. Ch 2, turn.
Row 3
Repeat Row 2.
Rows 4 & 5
Work a BPD on 2nd DC in previous row and in the next 3 DC. Work a FPC around the front post of next 3 DC. (See the basket weave forming?) Ch 2, turn.
Rows 6-10
Repeat Rows 2-5. Fasten off, weave in ends.
Row 7 (Creating spaces for Ribbon Row)
Attach Red to where you left off… *Ch 3, skip 3 DC, SC in next DC. Repeat from * across. Turn.
Row 8 (Creating spaces for Chicken Row)
*Ch 3, SC in next SC. Repeat from * across.
"Lace" Basket Border
Row 9
Slip stitch into first ch 3 space. *Ch 2, work 6 DC in ch 3 space. Slip stitch into next ch 3 space. Repeat from * across ending with slip stitch at left edge of row. Fasten off, weave in ends.
Ribbon Trim
Attach White in next-to-top row at side of potholder. Make a chain long enough to weave in and out over to about 3/4 of the way across. Fasten off.
Do the same thing on the other side of the row. Weave it through the row and tie ends together in bow.
Chicken
Row 9
Attach White in first ch 3 space of Row 7 (you will skip row 8 and work in behind it) . Ch 2, work 2 DC in space. DC in next SC. *3 DC in next space, DC in next SC. Repeat from * across ending with 3 DC in last space. Ch 2, turn.
Row 10
DC in each stitch across. Ch 2, turn.
Row 11
2 DC in first DC, DC in each remaining stitch across, work 2 DC in last DC. Ch 2, turn.
Row 12
DC in each DC across, ch 2, turn.
Row 13
Work 5-DC Popcorn in each of first 4 DC. DC in next 7 DC. Work 5-DC Popcorn in next 3 DC's. DC in next 7 DC (Change to Red by pulling Red through last draw through of 7th DC). With Red, work 5-DC Popcorn in last 3 DC's. Ch 2, turn.
Row 14
Work Reverse 5DCP (R5DCP) (still with Red) in stitch between first two popcorns. Work R5DCP in between next two popcorns. Work R5DCP in DC after last popcorn. (Three R5DCP's). On last draw through change back to White. DC in next 5 DC. Work R5DCP in each of next 5 DC. DC in next 7 DC. (Work R5DCP in between next two popcorns) three times. DC in last DC. Ch 2, turn.
Row 15
(Work 5DCP in between next two popcorns) three times. DC in next 7 DC. Work 5DCP in DC before next popcorn. (Work 5DCP in between next two popcorns) four times. DC in next 6 DC, changing to Red on the last DC. Work 5DCP on top of next Popcorn. (Work a 5DCP in between next two popcorns) twice. Drop Red and fasten off.
Row 16
With White, work R5DCP on top of Popcorn and in between each of next two popcorns. DC in next 14 stitches. Work R5DCp on top of next popcorn and another one over next popcorn. DC in next 9 stitches. Work R5DCP over each of last two popcorns. Ch 2, turn.
Row 17
Work a 5DCP in between popcorns. DC in next 9 stitches. Work 5DCP over next popcorn. DC in next 17 stitches. Work 5DCP over next two popcorns. DC in last stitch. Ch 2, turn.
Row 18
Work 5DCP in base of ch 2 just made (increase). (Work 5DCp in between next two popcorns) 3 times. Ch 2, sl st in next stitch and slip stitch across to stitch before next popcorn. Ch 2, work 5DCP in next popcorn. Ch 2, slip stitch in next stitch and next 6 stitches. Ch 2, work 5DCP in stitch before last popcorn. Fasten off, weave in ends.
Attach Red to right hand popcorn of chicken's head. Ch 2, work a 5DCP in that stitch, and (work 5DCP in between next two popcorns) twice. Work a 5DCP in last popcorn. Fasten off, weave in ends.
Chicken Beak
Attach Yellow held together with a strand of yellow embroidery floss (it adds dimension and color) to the left side of the second row above the Red. Work SC, HDC, DC, HDC and SC. Slip stitch in same stitch. Fasten off.
Chicken Eye
Cut a string of Black yarn about 2 feet long. Put a loop on the end as usual, pull it through from back to front in the space where you want the eye to be. Draw yarn through the loop to fasten tightly. Ch 1, work a 3-SC Popcorn in a stitch on the potholder. Slip stitch to potholder. Draw end thru to back and fasten off.
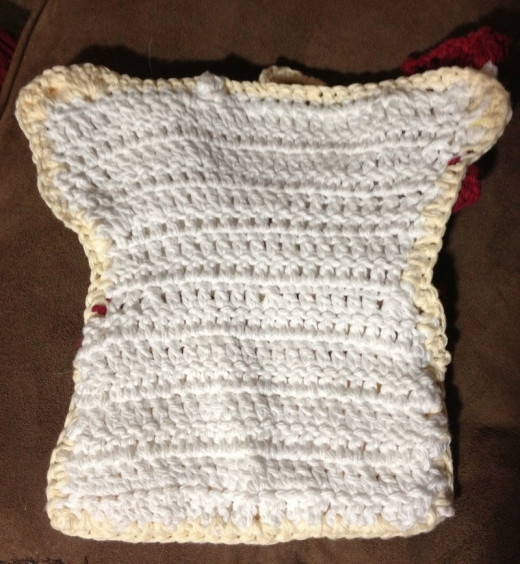
Now Let's Make Her Into A Potholder - Side TWO
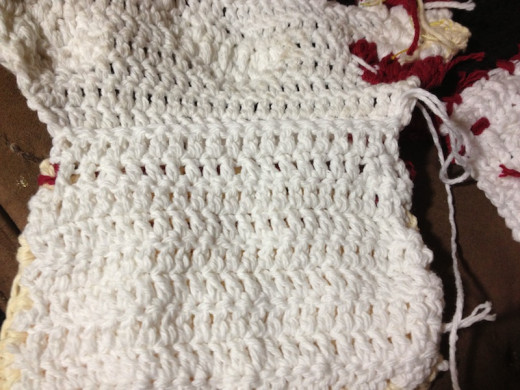
Normally I would make an exact copy of the shape for the back side, then slip stitch the two sides together. In this case, it seemed easier to work the back side directly onto the front side, so that's exactly what I did. I'll tell you how I did it.
I started by making a chain 28 like the front side begins. I worked a DC in the 4th chain and in each chain across, again like the front side. At that point, I attached the piece to the front with a slip stitch. Then chain 2, slip stitch one row up on the side, turn, and DC in each stitch across. Slip stitch to the other side, chain 2, slip stitch one row up, turn, and work in each DC across. That method is demonstrated here in the photo.
After the basket level is finished, Mrs. Chicken starts to get wider. At that point, I worked increases evenly across the row (2 DC in one stitch) as needed to make the back lie flat against the front. I continued in that manner until the back layer was completed.
For her red comb, I slip stitched just under it because I did not want the white to show.
Great Crochet Accessories From Amazon - My Hand Picks!

Mrs. Chicken's Completed Back Side

Making The Border & Hanger
Attach Cream at top center of potholder. Work a SC in each stitch around entire potholder. When you arrive back where you started, turn and slip stitch to 2 stitches to side of center. Chain 8, skip to 2 stitches to other side of center, and slip stitch. Ch 1, turn, and work a SC in each stitch of the chain forming the hanging loop. Slip stitch into border, fasten off and weave in ends.
What Do You Think Of This Pattern? - Come On, You Can Tell Me!
What Are Your Thoughts On This Pattern?
Learn Crochet On YouTube - Right Or Left Handed!

A Note From Your Designer...


Hi, I'm SheilaSchnauzies, also published as SheilaSparkles, and my life's passion is designing in Crochet! I also love to share gifts with friends, and this pattern is my gift to you! I give away about 95% of my pattern designs free. The other 5% are sold on my pattern store at Craftsy.com to benefit the vet expenses of my Miniature Schnauzer Rescue, Sheila's Schnauzies.
Just one little favor, please... I would appreciate it if you do not post this pattern anywhere on the Internet or in the 'real world.' Instead, you are most welcome to provide a link to this webpage.
I use a system I call the "Official Schnauzer Difficulty Rating" just for fun, to rate the difficulty of my patterns. If it's a 3/5 or more, I'll explain why I consider it more difficult. A few of my designs use techniques that are a bit unconventional! If it's one of those patterns, I'll warn you ahead of time. I do a lot of custom-fit patterns, for example. They are made to fit YOU, not a measurement from a chart. They're surprisingly easy to do and actually end up fitting. That's a good thing, yes?
So glad you found my patterns! I hope you really enjoy making whatever it is you're making! Crochet hugs, -Sheila
Honored To Be An Associate Professional Member of Crochet Guild of America!

"Crochet thread is the ink with which I will sign my life." –SheilaSchnauzies


